
When a customer submits an enquiry form on your Shopify store, you can automatically send email notifications to the customer and your team.
With Quotes Guru, you can configure email templates separately for each enquiry form. This allows you to customize the email subject, message, branding, recipients, and other email settings based on the type of enquiry.
For example, you can use different email settings for a Contact Form, Wholesale Enquiry Form, Product Enquiry Form, or Custom Request Form.
Why Set Up Email Templates for Each Enquiry Form? #
Different enquiry forms may require different email messages or recipients.
For example:
- A Contact Form can notify your general support team.
- A Wholesale Enquiry Form can notify your sales team.
- A Product Enquiry Form can be sent to a specific product specialist.
- A Service Request Form can notify the team responsible for that service.
Setting up a separate email template for each form helps make sure that the customer receives the right confirmation message and the enquiry reaches the right team.
How to Access Enquiry Form Email Templates #
Follow these steps to configure the email templates for an enquiry form.
Step 1: Open Quotes Guru #
From your Shopify admin:
- Go to Apps.
- Open Quotes Guru: RFQ & Hide Prices.
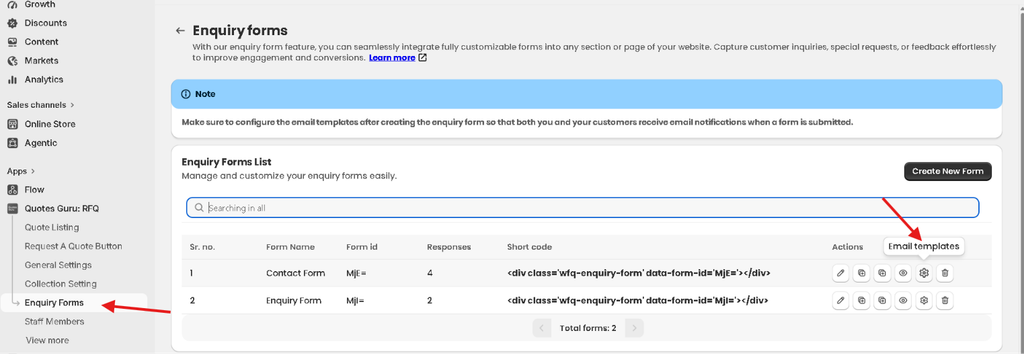
- From the left-hand menu, click Enquiry Forms.
You will see a list of all the enquiry forms created in your store.
For each form, you can see information such as the Form Name, Form ID, Responses, Shortcode, and available actions.
Step 2: Select the Email Templates Option #
In the Enquiry Forms section, click Email templates. This will open the email template settings for your enquiry forms.
You can configure the email templates for the selected form without changing the settings of your other enquiry forms.
Configure the Admin Email Template #
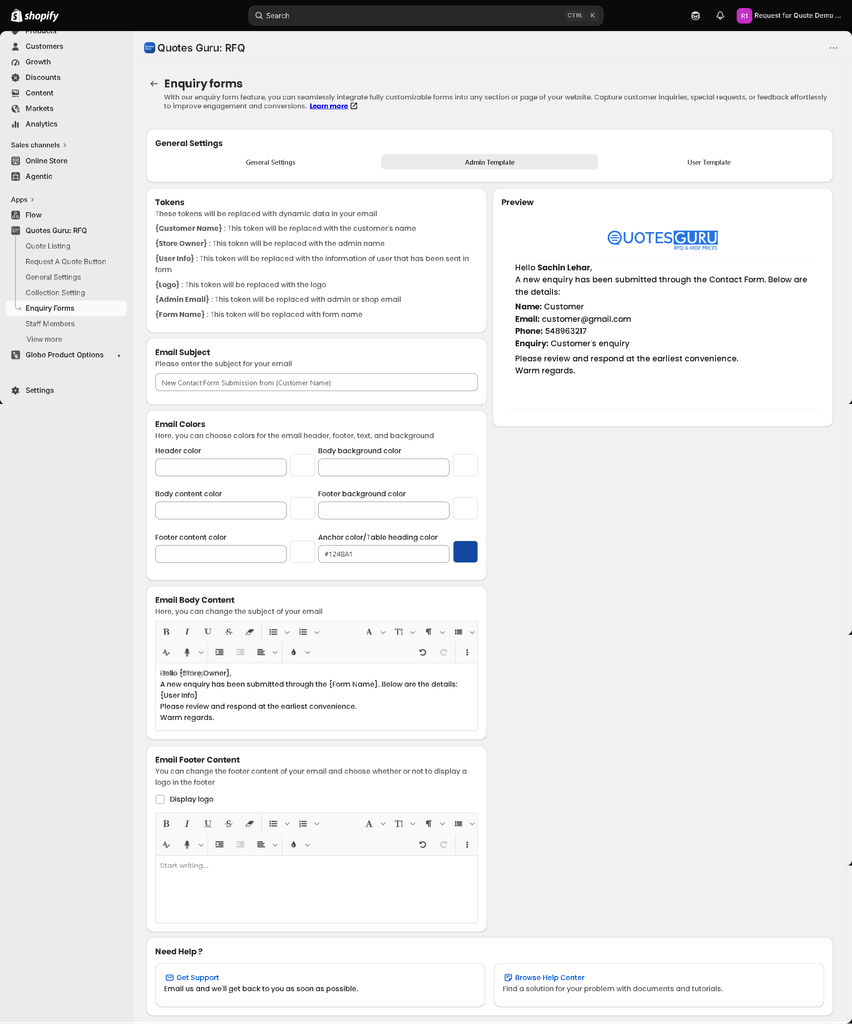
The Admin Template controls the email your store team receives when a customer submits the enquiry form.
For example, if a customer submits your Contact Form, you can configure the email to notify your support or sales team.
Select the Admin Template tab. You will see the following sections.
Available Tokens #
Tokens allow you to automatically add enquiry information to the email. The available tokens include:
| Token | Description |
|---|---|
{Customer Name} | Displays the customer’s name |
{Store Owner} | Displays the store owner’s name |
{User Info} | Displays the information submitted through the form |
{Logo} | Displays your store logo |
{Admin Email} | Displays the store’s admin email address |
{Form Name} | Displays the name of the enquiry form |
For example, you can use:
Hello {Store Owner},
or:
A new enquiry has been submitted through the {Form Name}.
The tokens are automatically replaced with the relevant information when the email is sent.
Customize the Admin Email Subject #
The Email Subject field lets you define the subject line for the admin notification.
For example:
New Enquiry Received – {Form Name}
or:
New {Form Name} Submission from {Customer Name}
Using the {Form Name} token can be particularly useful when you have multiple enquiry forms because your team can identify the type of enquiry directly from the email subject.
Customize Email Colors #
You can customize the appearance of the email to match your Shopify store branding.
The available color settings include:
- Header color
- Body background color
- Body content color
- Footer background color
- Footer content color
- Anchor color
- Table heading color
You can enter your brand colors or use the color picker provided in the settings.
The preview on the right side lets you see how your email will appear.
Customize the Admin Email Body #
The Email Body Content editor allows you to customize the main message your team receives.
You can use the available formatting tools and tokens to create your own message.
For example:
Hello {Store Owner},
A new enquiry has been submitted through the {Form Name}.
{User Info}
Please review the enquiry and respond at your earliest convenience.
Regards.
You can modify this message based on the purpose of your enquiry form.
For example, a wholesale enquiry could include an internal message such as:
A new wholesale enquiry has been received. Please review the customer’s details and follow up with them.
Customize the Admin Email Footer #
The Email Footer Content section lets you add additional information at the bottom of the email.
You can use this area for:
- Your support email
- Internal instructions
- Contact information
- Additional business information
You can also enable Display logo if you want your store logo to appear in the email footer.
Configure the Customer Email Template #
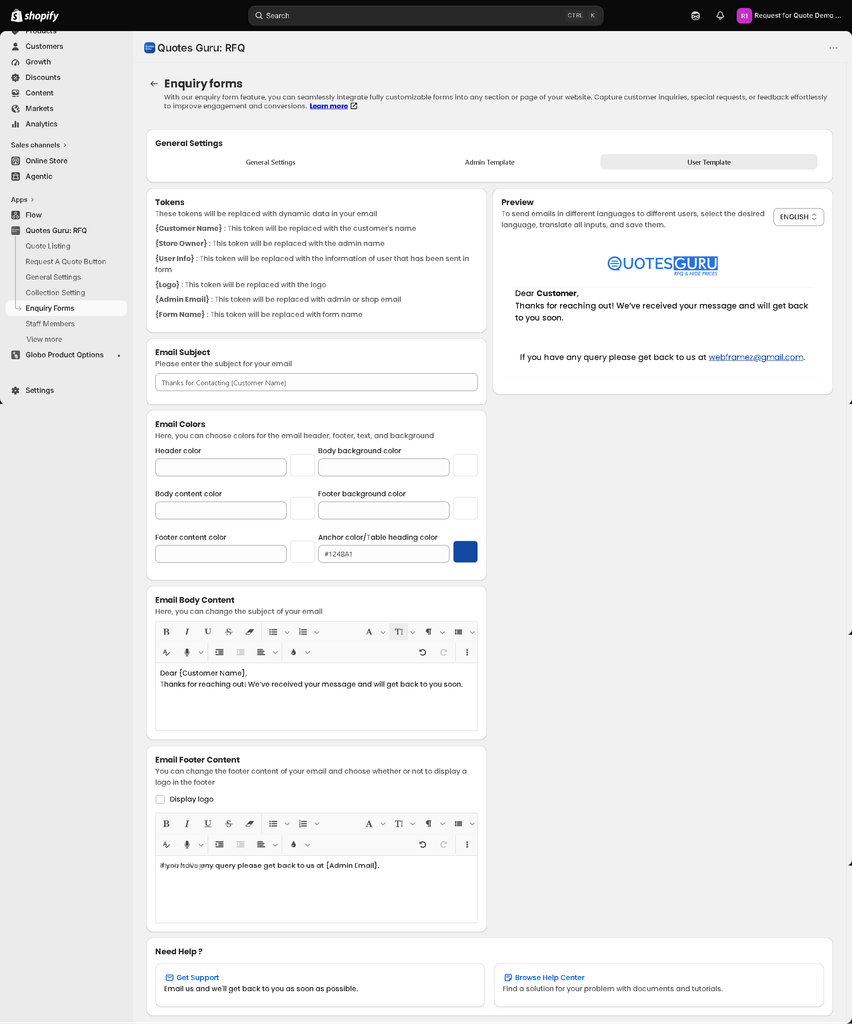
The User Template is used for the email sent to the customer after they submit an enquiry form.
Select the User Template tab.
This template allows you to send a confirmation message to the customer and let them know that their enquiry has been received.
The customer email includes the same type of customization options, including:
- Available tokens
- Email subject
- Email colors
- Email body content
- Email footer content
- Logo display
Customize the Customer Email Subject #
The Email Subject field controls the subject line that the customer sees.
For example:
Thanks for Contacting {Store Owner}
or:
We Received Your {Form Name} Enquiry
A clear subject line helps customers immediately understand why they received the email.
Customize the Customer Confirmation Message #
Use the Email Body Content editor to create your confirmation message.
For example:
Dear {Customer Name},
Thanks for reaching out! We’ve received your enquiry and will get back to you soon.
If you have any questions, please contact us at {Admin Email}.
Regards,
{Store Owner}
You can change the message based on the purpose of the form.
For example, a wholesale enquiry could say:
Dear {Customer Name},
Thank you for your interest in working with us. We’ve received your wholesale enquiry and our sales team will review your request and contact you shortly.
Customize the Customer Email Footer #
The Email Footer Content section lets you add additional information below the main message.
For example:
If you have any questions, please contact us at {Admin Email}.
You can also enable Display logo to show your store logo in the footer.
Preview Your Email #
Quotes Guru provides a preview panel so you can check the email before using it.
As you change the subject, colors, body content, or footer, review the preview to make sure the email looks the way you want.
The preview also shows how the dynamic tokens will appear when the email is generated.
Set Up Different Emails for Different Enquiry Forms #
One of the main benefits of Enquiry Form email templates is that you can configure them according to the purpose of each form.
For example:
| Enquiry Form | Admin Email Purpose | Customer Email Purpose |
|---|---|---|
| Contact Form | Notify the support team | Confirm the enquiry was received |
| Wholesale Enquiry | Notify the sales team | Confirm the wholesale request |
| Product Enquiry | Notify the product team | Confirm the product enquiry |
| Custom Request | Notify the relevant staff member | Confirm the request |
This is particularly useful when your Shopify store has multiple enquiry forms for different customer needs.
Important: Configure Email Templates for Every Form #
If you have created multiple enquiry forms, make sure you configure the email templates for each form separately.
For example, if you have:
- Contact Form
- Wholesale Form
- Product Enquiry Form
open the email template settings for each form and customize the appropriate Admin Template and User Template.
This ensures that customers receive the correct confirmation message and your team receives the relevant enquiry notification.
The existing Enquiry Forms module supports multiple forms, with 1 form available on the Pro plan and unlimited forms on the Premium plan.
Frequently Asked Questions #
#
Yes. Quotes Guru allows you to configure email templates for individual enquiry forms, so different forms can have different email content and settings.
#
Yes. You can configure the User Template to send a confirmation email to the customer after they submit the form.
#
Yes. The Admin Template can be configured to notify your team when a customer submits an enquiry.
#
Yes. You can use supported tokens such as {Customer Name}, {User Info}, {Form Name}, and {Admin Email}. The tokens are replaced with the relevant information when the email is sent.
#
Yes. You can customize the email colors, content, footer, and logo to match your store branding.
#
Yes. This is useful when different enquiry types need to be handled by different teams, such as sales, support, or wholesale teams.


