Not every product in your store needs the same quote form. A simple product might only need a basic name and email field, while a custom or high-value item might need detailed specifications, delivery dates, and special requirements. With Quotes Guru, you can assign different quote forms to different products — so every customer gets a form that’s relevant to what they’re asking about.
Note: Assigning quote forms to specific products requires the Pro Plan. On lower plans, your quote form will appear on all quoted products by default.
Before You Start #
Before assigning different forms to different products, make sure you have:
- Multiple quote forms created — You need at least two forms set up before you can assign them to different products. If you haven’t created multiple forms yet,
start here: 👉 How to Create and Manage Multiple Quote Forms - Products already set up in Shopify — Make sure all the products you want to assign forms to are already created in your Shopify store
How It Works #
Each quote form in Quotes Guru has its own product assignment settings. You go into each form individually and tell it which products it should appear on. This means:
- Form A shows on Product 1 and Product 2
- Form B shows on Product 3 and Product 4
- Form C shows on an entire collection
You control this from inside each form’s settings — not from the product page itself.
How to Assign a Quote Form to Specific Products #
Step 1: Go to Quote Forms
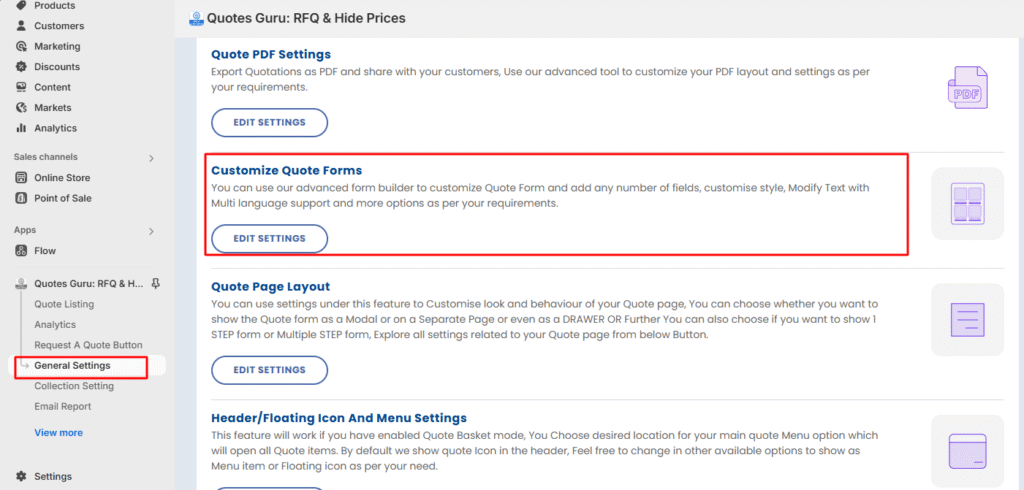
- Open Quotes Guru: RFQ & Hide Prices in your Shopify admin
- Click General Settings in the left sidebar
- Find and click Customize Quote Forms
- You’ll see a list of all your quote forms
Step 2: Open the Form You Want to Assign
- Find the form you want to assign to specific products
- Click Edit to open the form settings
Step 3: Go to “Choose Products” Section
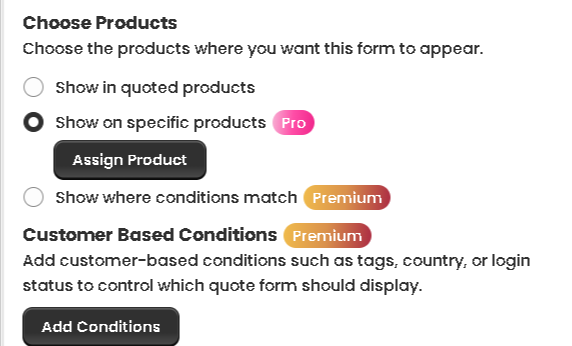
- Scroll down to the Choose Products section
- You’ll see three options:
- Show in quoted products — The form appears on all products in your quote list
- Show on specific products (Pro) — Manually select individual products
- Show where conditions match (Premium) — Use rule-based conditions
Step 4: Select “Show on Specific Products”
- Select “Show on specific products”
- A product search field will appear
- Type the product name to search for it
- Select the product from the search results
- Repeat for all products you want this form to appear on
Step 5: Save Your Settings Click Save to apply the changes. The form will now only appear on the products you selected.
Step 6: Repeat for Each Form Go back to your form list and repeat the same process for every other form — assigning each one to its relevant products.
Example in Action #
Let’s say you run a store that sells both ready-made products and custom-made items:
- “Standard Quote Form” — Basic form with just name, email, and quantity. Assigned to your ready-made products like t-shirts and mugs
- “Custom Order Form” — Detailed form with fields for specifications, colors, sizes, delivery date, and special instructions. Assigned to your custom-made or made-to-order products
- “Wholesale Enquiry Form” — A form asking for business name, VAT number, and bulk quantity requirements. Assigned to your wholesale product collection
Each customer lands on the right form for the product they’re interested in — without any confusion or irrelevant fields.
Tips for Best Results #
- Keep forms focused — Only include fields that are relevant to the products assigned to that form. A shorter, focused form gets more completions than a long generic one
- Name your forms clearly — Use descriptive names like “Wholesale Form” or “Custom Order Form” so you can easily manage them in your form list
- Test each form — After assigning, visit each product on your storefront and make sure the correct form appears
- Use collections for efficiency — If you have a large number of products in the same category, assign the form to the entire collection instead of selecting products one by one


